A small Windows utility to reclaim disk space from orphan HCS container layers, built as an excuse to use the windows-rs crate.
I wrote dcmfree to clear some disk space that seemingly there was no other way of removing. It gave me the opportunity to build with the Windows native APIs via the windows crate.
The space in question was in C:\ProgramData\Microsoft\Windows\Containers\Layers. This directory accumulates layer folders left behind by modern Docker (in Windows-containers mode), Windows Sandbox sessions, and Hyper-V isolated containers — all of which route their storage through the Host Compute Service. Each layer folder is full of NTFS reparse points and hardlinks. del and Remove-Item refuse to remove them, even from an elevated shell, because traversing the reparse points and hardlinks requires SeBackupPrivilege and SeRestorePrivilege, and the supported way to actually delete a layer is the HCS HcsDestroyLayer API rather than the normal file APIs.
The existing tools I could find for this — docker-ci-zap and friends — target the legacy C:\ProgramData\Docker\windowsfilter store, not the HCS-managed path that modern Docker, Sandbox, and Hyper-V actually use.
What it does
dcmfree is a single binary that is both a native Win32 GUI and a CLI:
Enumerates every layer under the HCS layers directory and reports its size, file count, age, and whether it is still referenced by an active compute system.
Cross-checks against docker images / docker inspect to skip layers Docker reports as in use.
Enables SeBackupPrivilege and SeRestorePrivilege on its own token, then calls HcsDestroyLayer per orphan layer.
Has a --dry-run, a --min-age filter (default 1 day), and an explicit confirm before anything destructive.
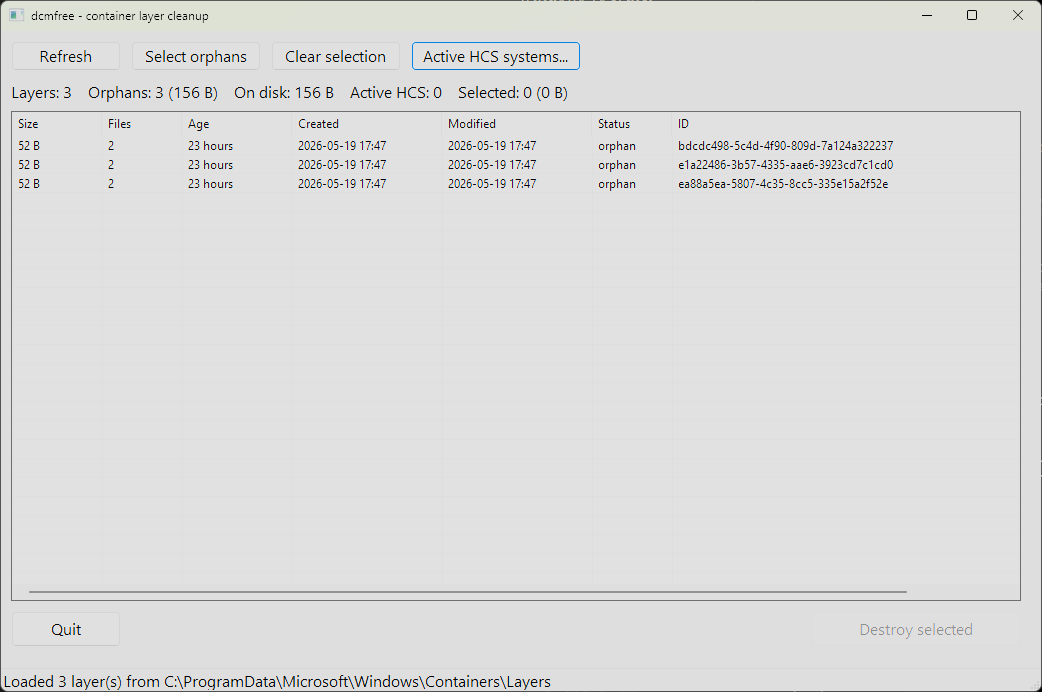
The GUI shows a ListView of layers with multi-select, runs the scan and destroy work on a worker thread, and keeps the message loop responsive so the Cancel button actually cancels.
The GUI listing three orphan layers under the HCS layers directory, each reported with its size, age, status, and ID.
What I learned from windows-rs
The windows crate exposes Win32 as typed Rust bindings generated from the official Windows metadata. A few things stood out:
HRESULT results auto-convert into windows::core::Result, so the FFI surface ends up looking like ordinary Rust error handling.
Handles like HCS_OPERATION and HLOCAL are proper newtypes, not *mut c_void, which makes it much harder to mix them up.
PCWSTR / PWSTR make NUL termination a type invariant. You still have to own the underlying UTF-16 buffer for the duration of the call, but the type signature is honest about what it wants.
Module organisation does not always follow the C headers. Microsoft documents HcsDestroyLayer as living in ComputeStorage.dll, so I went looking for a HostComputeStorage module in windows 0.60 — there isn’t one. The function is there, just bundled into windows::Win32::System::HostComputeSystem alongside everything else with an Hcs prefix.
Every Win32 handle is RAII-wrapped (OwnedToken, HcsOperation, OwnedComputeSystem, OwnedLocalAlloc), so a panic mid-destroy still closes everything. Every unsafe block has a // SAFETY: comment. It is a small program but it gave me a reason to be careful about what the operating system actually owns and what Rust does.
The source and prebuilt binaries are on GitHub. MIT licensed.
The graph in its final state, laid out in 3D. Recurring characters and ships cluster in the centre; the long tail is everything mentioned only briefly.
I have recently been learning about AI ingestion pipelines and decided I wanted to see if I could build a knowledge graph of something mostly non technical. I wanted to map out one of my favourite books, We Are Legion (We Are Bob) by Dennis E Taylor into a FalkorDB knowledge graph. I used a local Qwen3.6 model to scan sections of the book and extract characters, storylines, chapters and other aspects into a cohesive graph. I expected/wished that the graph would end up being clear enough that the main character’s Von Nuemann probe clones would perhaps be visible in the structure of the knowledge graph when modelled in 3D.
The final snapshot has 1,379 nodes and 4,601 edges. Of those, 392 nodes are scene-level episodic records, 987 are canonical entities, 3,361 edges are MENTIONS, and 1,240 edges are typed relationships between entities.
The shape of the graph
I initially asked the LLM to check and compose sections of the book into the following labels
Label family
Sections
People and groups
Character, Faction, Organization
Physical things
Ship, Tool, Structure, Resource, Location
Design systems
Skill, Capability, Technology, Tech_Node, Research
Narrative structure
Scene, Event, Plot_Arc
Relationships use a small canonical vocabulary: REQUIRES, UNLOCKS, PRECEDES, USES, OWNS, LOCATED_IN, IS_PART_OF, LEARNED_FROM, and the rest of the edges needed to express a tech tree or tutorial sequence.
The graph also keeps an Episodic node for every scene. Entity nodes represent canon objects. Episodic nodes represent where the extraction came from.
MATCH (scene:Episodic)-[:MENTIONS]->(n:Entity)WHERE n.name = 'GUPPI'RETURN scene.chapter, scene.scene, scene.summary
Phase one was too serial
The first version used Graphiti’s normal ingestion loop for chapters 1-11. It worked, and it left me with a useful seed graph: 403 nodes, 1,345 edges, and a catalog of entities that already had UUIDs, labels, summaries, and embeddings.
It was also too slow for finishing the book. Graphiti’s extraction path is good when you want the framework to own the whole process. Here I wanted a bulk import pipeline with checkpoints after every stage, so I could rerun one failed piece without reprocessing everything before it.
The second version bypassed Graphiti’s serial extraction loop and wrote directly to FalkorDB. The old graph became the catalog. Everything after chapter 11 went through a faster parallel pipeline and then merged into the same bobiverse_canon graph.
If a model call failed, I did not have to wonder which part of the graph was half-written. I deleted or regenerated that scene’s JSON and reran the stage.
Splitting without leaking text
The first mechanical step was turning a PDF extraction into chapters. The chapter splitter is just Python and regular expressions, but it needed to be stricter than my first pass.
Scene splitting was more interesting. The local Qwen model was used to split chapters into scene metadata such as “scene starts at line X and ends at line Y, with this POV/location/time/summary.” The script wrote the metadata to ingestible JSON files.
At the end of splitting, the project had 61 chapters and 297 JSON cene files.
Extracting entities in parallel
The extraction prompt was strict JSON: existing references, new entities, new relationships, scene metadata, and important events. Every scene got one output file.
The extractor sees that catalog and has to prefer existing references over new entities. That is what keeps “Bob 2.0”, “Bob-2”, and “Bob Version 2.0” from becoming three different nodes. The prompt helps, but I do not trust prompts to solve identity. Later we do the defensive work with exact matching, alias rules, and fuzzy matching inside the same entity type.
The final pass identified 727 new entities, mapped 8 proposed entities back to the existing catalog, and kept 1,164 relationships after endpoint resolution.
For each relationship, it matches both endpoint UUIDs and creates a RELATES_TO edge with a canonical name and a grounded fact. For each scene, it creates an Episodic node and then attaches MENTIONS edges to every resolved entity mentioned in that scene.
Everything is idempotent on UUIDs. Re-running the writer is not a repair strategy for bad extraction, but it is safe for interrupted imports.
We send new entity summaries to an LM Studio embedding endpoint using qwen embedding in batches of 16 and stores the vectors in embeddings.npz, keyed by UUID. We then add the vector property when it creates the Falkor node.
The goods
A replay of the FalkorDB graph snapshot. Press Play, scrub the timeline, or skip to the final state.
Nodes are sorted by created_at. An edge appears when both of its endpoint nodes exist. New nodes start pinned at the origin, then get released into a 3D force simulation. If a node has a visible neighbor, it spawns near that neighbor; otherwise it starts with a small random offset. The effect is similar to a Gource replay.
The viewer uses 3d-force-graph on top of three.js. It loads the whole graph once, then toggles visibility during playback. Replacing the graph data every frame destroys the layout and makes the browser do far too much work. Keeping one simulation alive lets the layout settle while the timeline advances.
I also had to make MENTIONS edges optional. They are useful for provenance, but there are 3,361 of them, and drawing all of them is the fastest route to a low framerate slideshow. You can enable it using the settings cog in the bottom right of the visualisation above.
A node starts small, then grows as visible edges attach to it. Hubs become hubs while you watch, instead of appearing as giant spheres from frame zero.
A Rust video codec written from scratch for a 2001 handheld with no video hardware. Bad Apple paced to the GBA display refresh with audio, packed into a 32 MB cartridge.
Here is Bad Apple running on a Game Boy Advance ROM. The ROM contains a decoder, compressed video frames, and raw audio, all running inside the limits of a handheld from 2001.
GBA · ARM7TDMI·— fps·frame —
Loading…
VRAM96 KB
IWRAM32 KB
Hit play. This is a WASM emulator running in the browser, so forgive me if it stutters or refuses to start on your machine.
Bad Apple on a Game Boy Advance·00:00 / 00:00
A cropped recording of the ROM playing back, with the emulator audio synced underneath.
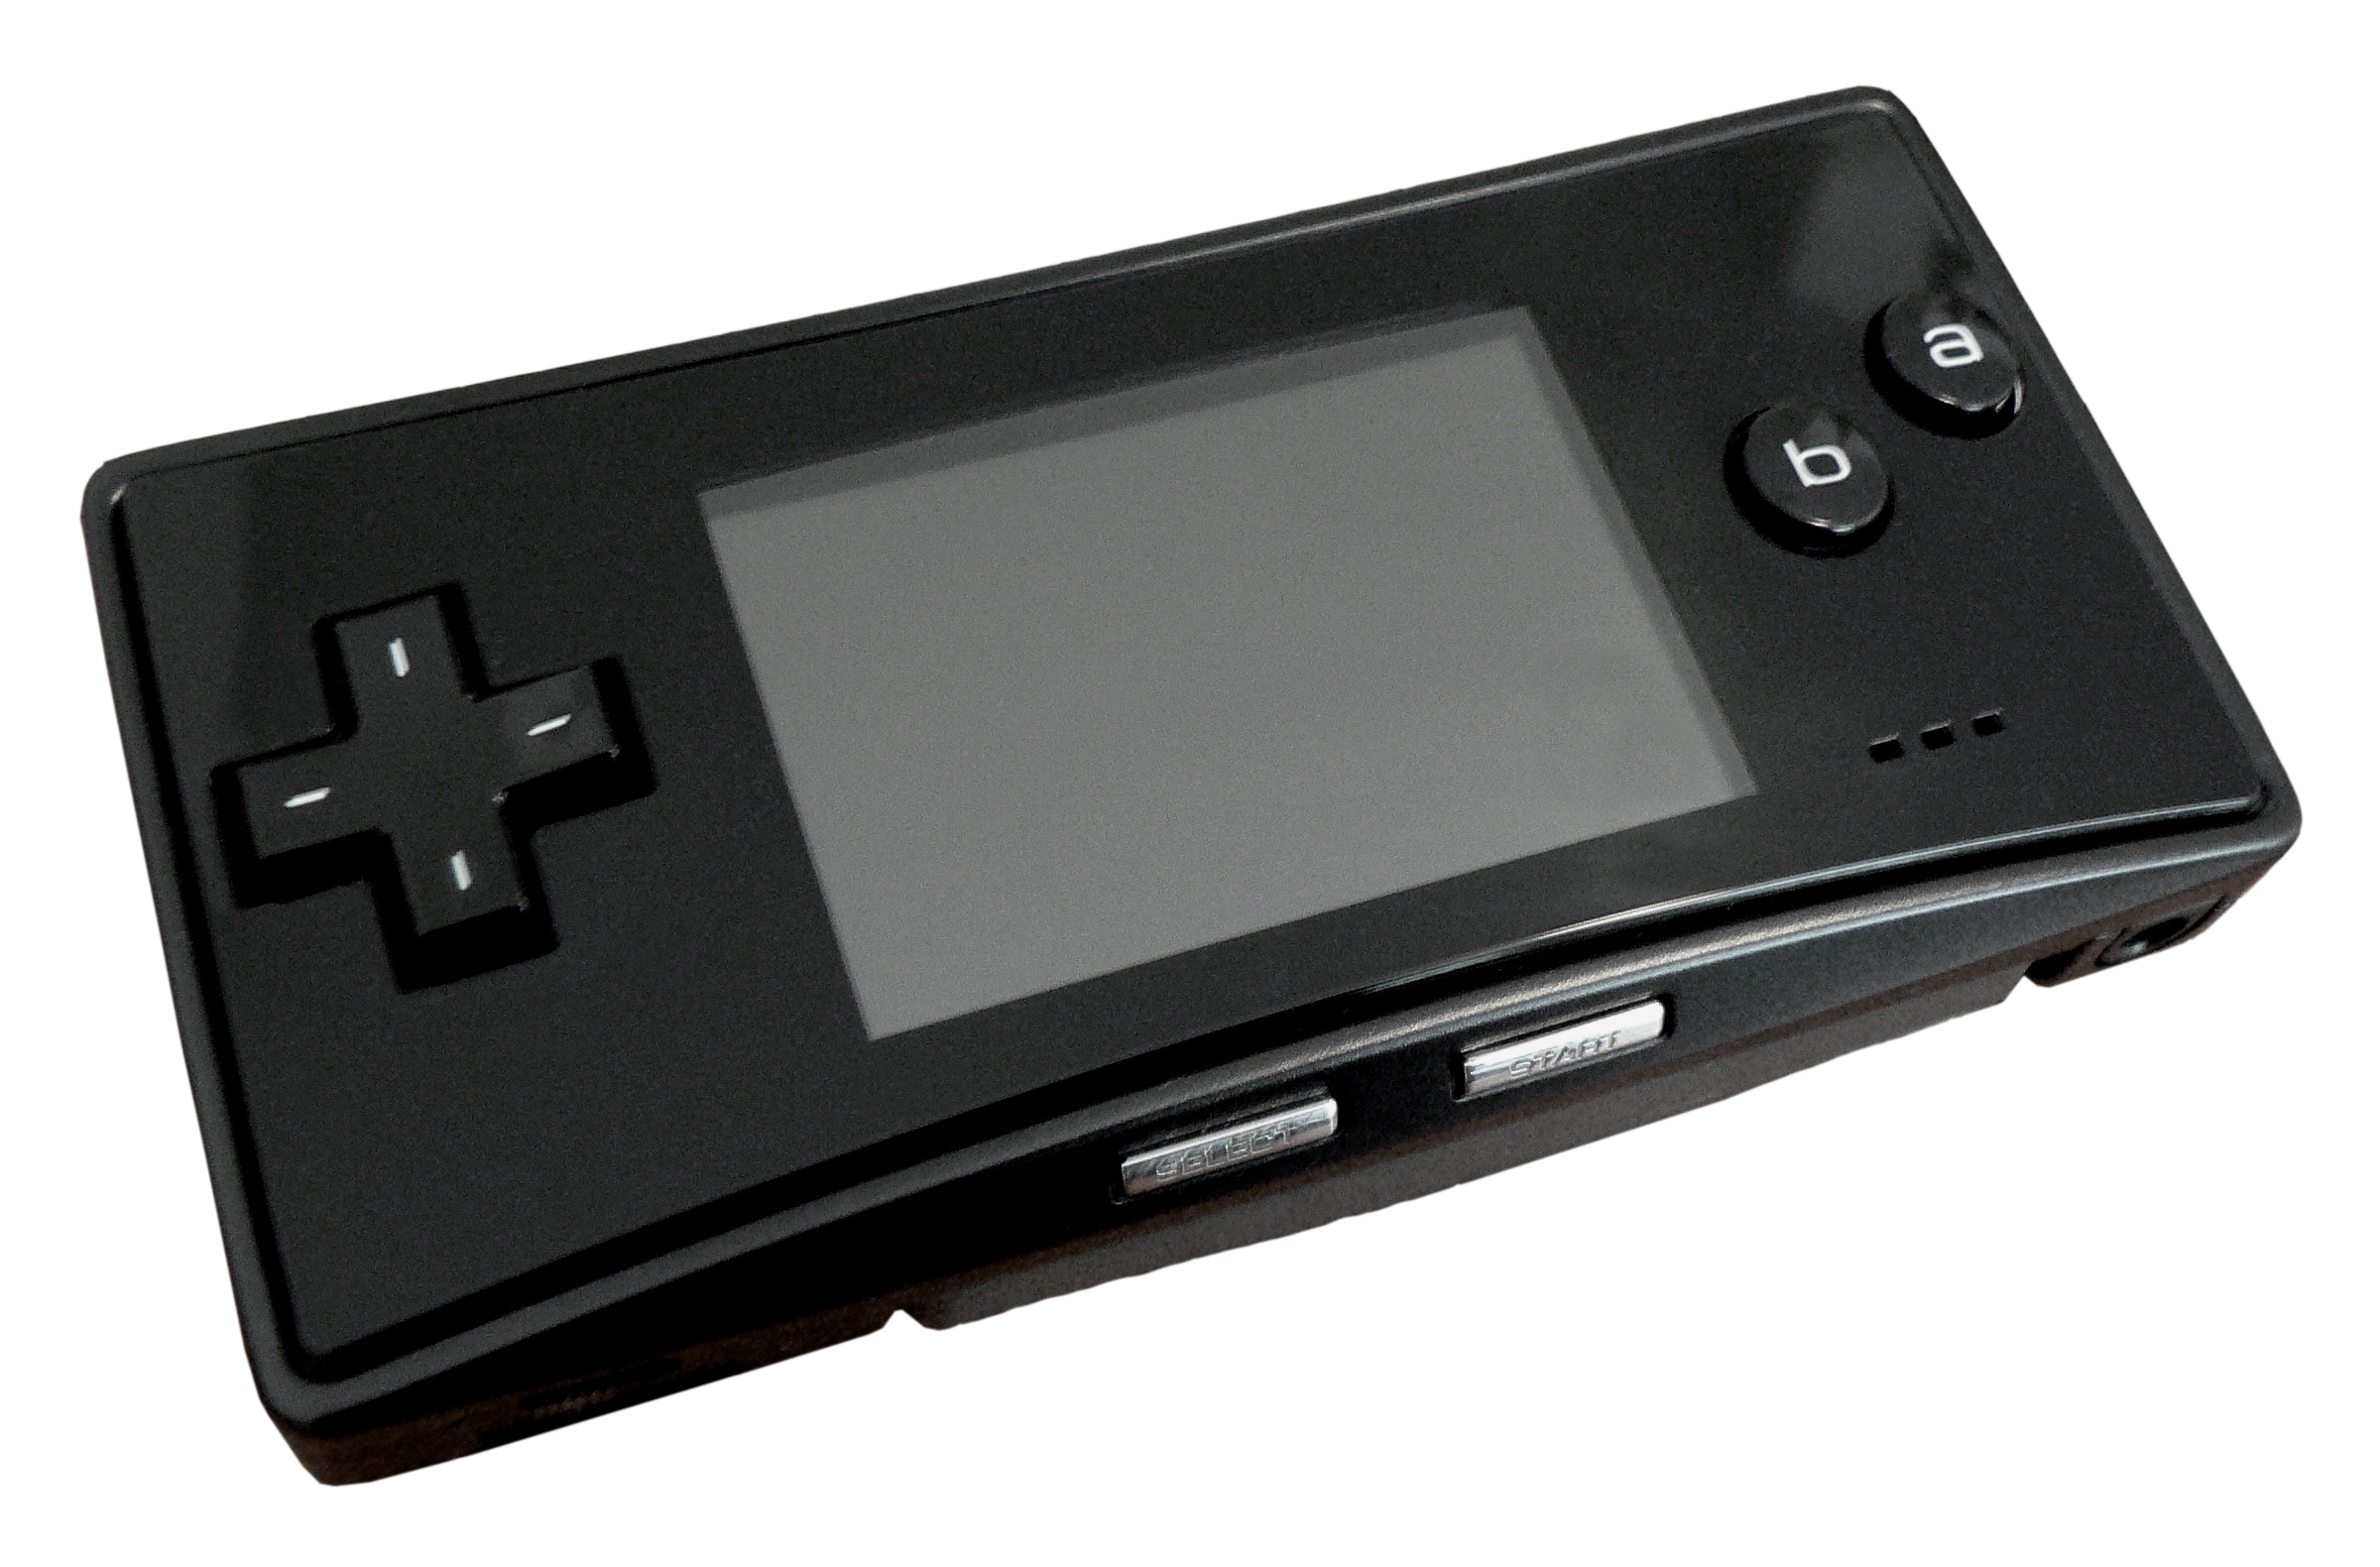
I have five Game Boy Advances in a drawer in my office. An original, an SP, a black Japanese Micro I bought on eBay, and two of the originals as backups for when the rest stop charging. They take batteries seriously, do not get firmware updates, and are not going to break. The Micro is the one I keep coming back to.
The Game Boy Micro, Japanese all-black variant. Photo by Seizethegray, CC BY-SA 3.0.
Earlier this year I loaded a dump of an official Pokémon video cartridge from 2004 onto an EverDrive GBA Pro and watched a few minutes on that Micro. The playback was bad enough that I stopped watching the episode and started watching the playback. The cart was a licensed commercial product. It was 2026. The floor for video on the GBA should be higher than this. So I wrote a codec.
The Game Boy Advance is a handheld console from 2001. 16.78 MHz ARM CPU, 240 by 160 screen, 96 KB of video memory, no hardware for video playback. Standard cartridges normally top out at 32 MB, which is the limit I target here. Anything moving on the screen has to be drawn by software, frame by frame, in the time the GBA gives you between screen refreshes.
The commercial video-on-cartridge line was Game Boy Advance Video, launched in 2004, with episodes of SpongeBob, Pokémon, Shrek and others on official cartridges. Most were Majesco-published paks developed by DC Studios; the Pokémon carts were published by Nintendo, and the later Movie Paks have their own caveats. Single-channel audio, usually 40 to 45 minutes per TV cart. Fan codecs exist too: METEO and Avi-2-GBA from the early 2000s converted AVI files to playable ROMs at low quality, the Caimans codec explored more advanced GBA video compression, and Ryandracus Chiaramonte’s libagmv is open source and is where I learned how block-based codecs are typically structured.
Three weekends later, I had Bad Apple playing once per VBlank with audio. The codec and the player are in Rust on both ends. The encoder runs on a laptop and produces a .gba ROM with the decoder, the video, and the audio compiled into the cartridge image. The decoder is the player. There is no separate runtime. I built it with Claude Code as a pair-programming loop: try a codec idea, read the generated Rust carefully, find out which parts the GBA disagreed with.
What is in the ROM
The ROM is a 32 MB cartridge image: decoder first, then the video packet stream, then contiguous raw audio, with the remaining space padded out to the cartridge size. Rendering those byte ranges as pixels gives three very different textures.
The decoder, 46 KB. Squint and you can see the splash screen embedded in the binary.
About 46 KB of ARM-compiled Rust, with a small splash image baked in. This is the player. It shows the splash, decodes frames, and sets up the audio timer and DMA.
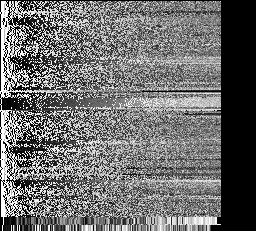
The video packets, one pixel per ~297 bytes.
The compressed video is a sequence of frame packets. The bright bands are keyframes, one per group of pictures, each carrying a fresh palette, codebook, and per-block payload. The dimmer rows in between are predicted frames: mostly SKIP blocks, with MOTION, VQ, and RAW blocks where the frame changes.
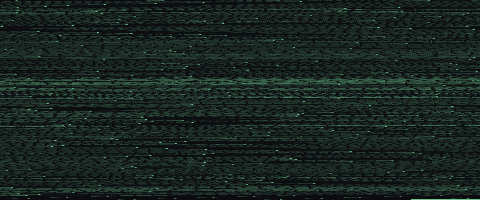
The audio data, one pixel per ~59 bytes.
4 MB of raw signed 8-bit PCM. No compression, no framing, no metadata. Each byte is a sample of the sound wave, and Timer0 clocks Direct Sound while DMA1 keeps FIFO A fed from the ROM stream.
A different view of the same data: every keyframe writes a 256-colour palette. Stacking each palette as a row gives a colour fingerprint of the whole video.
Bad AppleA few seconds of a Naruto episode I was debugging with
Bad Apple is almost entirely black and white with some greyscale, and the palette reflects that. The Naruto encode is full of colour throughout. The first three figures show what is in the cartridge. This last one shows what the codec did with the source.
How the codec works
Each frame is divided into 4-by-4-pixel blocks: 60 columns by 40 rows, 2,400 blocks per frame. Each block is encoded in one of four modes, two bits each, packed into a 600-byte mode bitstream:
Mode
Code
Payload
What it does
SKIP
0b00
none
Block stays put from the previous frame
MOTION
0b01
1 byte (dx:4, dy:4)
Copy from a nearby block in the previous frame
VQ
0b10
1 byte codebook index
Look up a 4-by-4 tile in the codebook
RAW
0b11
16 literal bytes
Write the bytes as-is
VQ (vector quantisation) is where the compression happens. A RAW block costs 16 bytes. A VQ block costs 1: an index into a shared codebook of 256 tiles, each a 4-by-4 block of pixels chosen by k-means clustering across the frames in a group of pictures. The decoder reads the index, looks up the tile, writes 16 bytes to the framebuffer. One byte in, sixteen bytes out.
The codebook is 4,096 bytes (256 entries at 16 bytes each), sent once per group of pictures. The predicted frames in the group reference it without resending. Amortised across a GOP, the codebook gets cheap quickly: each VQ block saves 15 bytes against RAW, so after a few hundred VQ blocks the codebook has paid for itself.
Here is what one keyframe looks like alongside the encoded components that produced it:
One GOP, decoded
Frames 1080–1139 (0:18, one full GOP). Hover or tap any pixel to trace it through the codec.
Decoded frame VQ · RAW · ■ MOT · skip = transparent
The GBA gives you about 280,000 cycles between screen refreshes. That is the budget for everything: dispatching mode bits, copying pixels, swapping framebuffers, and staying out of the audio hardware’s way. Most of it evaporates into reads from cartridge ROM, which is on a 16-bit bus and slow. The decoder lives in IWRAM, the GBA’s 32 KB of fast on-chip RAM, and the codebook lives there too.
Two surprises came out of the hardware datasheet. The first: 8-bit writes to VRAM duplicate the byte across both halves of the surrounding 16-bit word. I was not aware of this at the time, so the first build had corruption on every block boundary until I switched to 32-bit writes. The second: the cartridge bus is a single channel shared by video reads and audio DMA. Audio wins because DMA1 has higher priority than the DMA3 copy I use for video. The decoder fits around it.
The audio path went through a few rewrites before settling. The first attempt used IMA-ADPCM, an old 4-bit compression format, with ring buffers and DMA staging. It saved space and spent all the goodwill immediately. The second attempt interleaved audio and video in the ROM like a film reel, with audio printed alongside each frame. That failed because 4-bit ADPCM sounded awful and 8-bit PCM chunks did not pack tightly enough. The version that runs now is deliberately boring: raw signed 8-bit PCM laid out contiguously in ROM, Timer0 setting the sample rate, and DMA1 feeding FIFO A. No decoding, no per-frame audio chunks. The encoder did the work once on a laptop.
What it does not do well
This is still a codec built around one unusually forgiving music video. Bad Apple is almost all hard-edged black and white shapes, which makes palette quantisation and block reuse look better than they will on noisy, colourful footage. The visible flaws are the expected ones: banding in gradients, occasional motion artefacts, and quality swings around hard scene changes where the GOP structure has to catch up.
Where this lands
Bad Apple on this cart looks better than the Pokémon episode on the official video cart, but the comparison flatters me. Most GBA Video TV paks fit 40 to 45 minutes of full-colour video into 32 MB, well under a megabyte per minute. I use almost the whole cartridge for 3 minutes 52 seconds of source that is mostly black and white and forgiving to a block-based codec. The codec works because the source is forgiving, not because the GBA stopped being difficult.
The next thing is encoding longer source at lower bitrates and seeing how anime holds up. Fewer keyframes, more SKIP blocks, and a better fit for a constrained codebook matter more once the source stops being a perfect silhouette demo.